SCC Magazine Project Eclipse – Final
Mitsubishi Eclipse GSX Part Six
Time To Say Goodbye
By Kieth Buglewicz
Reprinted with Permission

It’s not like we didn’t know it was going to happen, It never really belonged to us, despite how close we had gotten to the car. No, our long-term Mitsubishi Eclipse was ultimately, a short timer. But in the year (plus 3 months, thanks to Mitsubishi’s benevolent PR king Kim Custer) we had the car, we had more fun than is probably legal, were able to cram a good amount of performance under the hood, and discovered at the end that it, indeed, all work as advertised.
This speaks volumes for the versatility and flexibility of Mitsubishi’s 2.0 liter turbocharged four cylinder. But despite our efforts, we could have done more. The brakes were still stock. The engine itself had never been opened, so there was room for porting and polishing. The car desperately needed an upgraded intercooler. The list goes on practically forever, and you can see what else we would have done if we could have kept the car longer by checking out Dave Coleman’s sidebar.
Rather than express a wish list, I’m here to recap what we have done, and try to keep emotion out of it.
We got the Eclipse in May of 1997 with a scant 26 miles on it. It was, however, a case of the third time being charmed, as we had gone through two other cars previously. Our first car was virtually identical (it had a brown interior) and was pulled from Mitsubishi’s press pool. However, after a week with the car, an ugly problem reared its head: The transmission was making horrendous gronking sounds in first gear at full throttle. We returned the car, and were told it was actually a pre-production vehicle that had already had the transmission replaced. We were asked if we would like a brand-new car built especially for us at Mitsubishi’s Normal, 111. plant. Not being stupid, we said yes.

After a week . . . The transmission was making horrendous gronking sounds in first gear at full throttle.
The second car we never actually saw. After about a month of waiting (not unusual for a special order), it showed up in April. We got the call from Steve Kosowski (also of Mitsubishi PR) that our new baby was delivered…but there was another problem. Somewhere, somehow, despite the fact that Steve wrote on the order form that we wanted a five-speed manual transmission (he showed us the form), the car arrived with an automatic. Crap.
Since, as everyone knows, an automatic transmission in a car like the Eclipse would be just as useful as training wheels, we agreed with Steve’s suggestion that the plant build us another car. One month later, it arrived. Steve told us it wasn’t quite to spec either, as it had a gray interior rather than a brown and black one. Gray, brown, black, lavender…as long as all the big mechanical bits were in place, we were happy.
It didn’t take long for us to break in the car After an oil change at 500 miles, and another at 1,000, we were ready to play. One thing had become apparent to us almost immediately: If we had looked at the order form more carefully, we would have skipped the sunroof. This is advice anyone over about 5 feet 11 inches tall should take to heart. The seating position was also uncomfortable for tall people because of the low slung steering wheel. Even at its uppermost adjustment, it was in the way Incidentally, aside from amputees, I can’t imagine who would set the wheel at its lowest setting; the wheel almost completely blocks access to the pedals.
Despite having to adjust ourselves to sit in the car, we were impressed by its power and grip. But the break-in period also allowed us to determine our first course of action. One of the first things that drew attention to itself was the suspension. The Eclipse is no light weight ours weighed in at more than 3,500 lbs with two people on board but its strong motor makes up for it by yanking the car around at a good clip. The suspension is stiff enough to stick the car in a turn, but soft enough to let the heavy body gently bob up and down on fast sweepers. You never feel like the car is going to fly out of control, but the feeling is a little unsettling. We decided to upgrade not just the springs, but the shocks as well to give us the handling we wanted. We opted for Eibach’s Pro Kit springs along with Koni’s s adjustable shocks.
Not only did the suspension mods work, but the incremental lowering job (only about an inch all around) hunkered the car closer to the ground, making it look like a badger: Low, wide, and always angry about something. Naturally, the suspension mods made the car much more capable than its stock tires (lackluster Goodyears) could handle. So we upgraded to 225/40ZR18 Dunlop SP9000 tires. They proved to be a good choice, with very good dry grip and virtually untouchable wet grip. Coupled with the all-wheel drive character of the Eclipse, this was one sports car that was unafraid of the rain.
The second thing we noticed about the car in its stock form was that after an initial surge of boost, power would start to fall off at about 5500 rpm. Frankly, revving the engine to its 7000 rpm redline was fruitless: The engine only produced noise after about 6200 rpm One glance at the engine bay and it was clear the anemic stock intake and exhaust were to blame. We installed a HKS cat-back exhaust system, which produced the expected exhaust note for an Eclipse: A loud farting blat. On the intake side, we installed a K&N intake, a GReddy blow-off valve, and a Road/Race Engineering intercooler pipe.
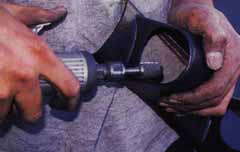
Mike Welch at Road/Race is well known in the Eclipse community as a guy who seems to have an unhealthy amount of knowledge about these cars. If he could, I’m sure he’d sleep with one under his pillow. But that knowledge made him our unofficial Project Eclipse Performance Guru, and we turned to him for just about every question we wanted answered. Opening up the intake was his first suggestion, and he let us in on a secret that is often overlooked. The stock blow-off valve feeds back into the intake pipe. This keeps the computer happy, since it has already measured that air with the air mass sensor. To keep noise levels down though, the blow off valve dumps into a four-inch long dump pipe that extends far down into the intake hose.
Not only did the suspension mods work, but the lowering job (only about an inch all around) hunkered the car closer to the ground, making it look low, wide, and always angry
What this means is that although the intake pipe looks big from outside, it is significantly blocked by the dump pipe. Mike’s solution to this intake blockage is simple: Cut the return pipe out. It doesn’t actually make a lot of power, but it adds to the responsiveness of the engine. The gains were immediately apparent. The car built boost much more quickly and held it much longer, making power almost all the way to redline.
Mike’s solution to this intake blockage is simple: Cut the return pipe out. It doesn’t actually make a lot of power, but it adds to the responsiveness of the engine
Making performance modifications to our car presented us with the problem of quantification. We needed to demonstrate that our Eclipse felt faster because it was, not because we could hear the whoosh of the turbo and the flatulent exhaust note more clearly after our mods. Luckily, we had a solution to getting “dyno” results from our Eclipse in the form of our Vericom 2000 performance computer.
In an oversimplification, the Vericom is essentially an accelerometer. By measuring how quickly a car accelerates in a certain gear, then plugging in weight, ambient air temperature and other factors, one can calculate how much power the car is making. The results were consistent enough for us to publish, as long as we tested back to back each time (the Vericom turned out significant fluctuations depending on air temperature). The result was a solid 30-hp increase for slightly less than $1,000 worth of parts that would be easy to install for even a mediocre mechanic.
Naturally, we wanted more power. So we decided to turn up the wick with more boost. This produced cries of “You’re gonna kill it!” from our photo editor, Les Bidrawn. Multiple assurances couldn’t dissuade him: He was certain we were about to murder our car.
Flush with our early success, we figured that just by wiring in an Apex boost controller and fuel computer, turning the boost up to about 17 psi and hitting the streets, we’d be flying fast. And we were right, to a certain extent. The boost controller fattened the midrange power significantly, but was unable to hold boost very long after about 5000 rpm. We had run up against another wall, although far earlier than we had anticipated. We turned to Road/Race for an answer.
The stock turbo, as it turns out, is barely adequate for the stock engine’s needs. Although the Eclipse is rated at a peak boost of 14 psi, it holds this only for a few hundred rpm before boost falls off to about 9 psi by redline. Part of the problem is with the crummy stock blow off valve, which has virtually no method of sealing against its seat, and has a spring so weak it can be pushed down with your pinkie. We replaced that in step one, but still had boost problems. We thought that by adding a boost controller, we would be able to hold boost to redline.
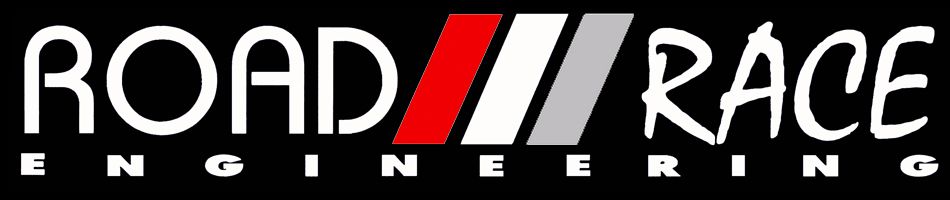
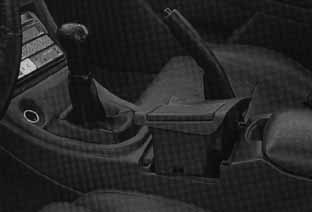
In the mean time, we had moved the Apex turbo timer, fuel computer and boost controller to the center console. Although the stock stereo sounded great, it was removed for our surgery. Replacing it was an Alpine three disc in-dash CD changer. The sound was great, and the unit was loaded with features. Competition Soundworks in Cerritos, Calif. did the installation work, and we undertook mounting the Apex gear under the Alpine unit ourselves. The result looked great, and was much more ergonomic.
The next step in our upgrade was the most drastic. Most Honda and Acura drivers would suggest the very popular T3/T4 hybrid turbo. However, that particular turbo requires significant heat shielding to prevent it from melting the air conditioner fan. Instead, Turbonetics in Moorpark, Calif., set us up with an upgraded version of the stock turbo. Since we were only planning to run about 18 psi of boost, the modified stock turbo would be more than adequate. We also had a couple other concerns, mainly that the car was driven daily, and we wanted a turbo that would give us the power we wanted without excessive lag. We also wanted something that would be reliable, for the same reason. Longevity was the key, and since the car did eventually have to go back to Mitsubishi, we wanted to return a working automobile, not a car-shaped pile of non-working parts.
Turbonetics modified the turbine and compressor housing of a stock Eclipse turbo to accommodate larger wheels. This in turn allowed the turbo to flow more than 30 percent more air without significantly increasing lag, an advantage we probably would not have had if we went to a physically larger unit. We once again turned to Road/Race Engineering for installation, where Mike had a suggestion for improving flow. A ported exhaust manifold, he said, would significantly aid flow to the turbine, as would porting the huge cast iron exhaust flange from the turbo to the exhaust down pipe. The result was much snappier throttle response, gobs of midrange power, and virtually no lag whatsoever.
But the high end was still falling off boost, regardless of the new turbo. One culprit we thought might be to blame was the fuel system. After we installed the turbo, the fuel cutout would abruptly shut off the fun in cool weather (when the intake charge was most dense). The car felt like it hit a wall each time it happened, and also made the check engine light come on for the first time (it also had us wondering if, after all, Les had been right). To cure the problem, we installed a set of 550 cc injectors from RC Engineering next, as well as a higher capacity fuel pump and exhaust gas temperature gauge to properly calibrate the Apex fuel computer. We also installed a 3inch stainless steel, mandrel bent downpipe from Hahn Racecraft and a 3-inch catalytic converter to remove the final obstructions from our exhaust system.
We once again succeeded in improving mid-range output, with another incremental gain at the high end. But at last, we found why top end power had been so elusive. While he was tuning the fuel compute; Mike Welch noticed that as he data-logged speed and rpm, the two would increase at the same rate (as they should) through the middle of the rev range, but at high rpm the engine would start accelerating faster than the car! There was only one answer: The stock clutch was being overwhelmed at high engine speeds when the turbo was at full song. The fix came in the form of a three-puck Exedy clutch.
Flush with our early success, we figured that just by with In an Apex boost controller and fuel computer, turning the boost up to about 17 psi and hit the streets, we’d be flying fast. And we were right, to a certain extent
Man, did it work. Finally, the top end acceleration matched the low- and mid-range surge. The engine held boost now to redline, and the car felt like we had installed an afterburner instead of a clutch. No sooner was the clutch installed than we took the car to the Streets of Willow at Willow Springs Raceway in Rosamond, Calif., for a little testing. The new clutch demanded respect, requiring good matching of revs at every shift to avoid a lurch when the clutch grabbed…and grabbed hard. But driven even moderately well, the Eclipse screamed around the track. Far from lithe and nimble, the GSX felt like it made its way around the track by getting the pavement in a death grip and bullying its way through the laws of physics. Driven full bore, the Eclipse could dive into each corner with the ABS pulsing like mad, fight its way to the apex, and then spit the corner out behind under full boost. Powering out of the corner was always the most difficult part, as terminal understeer was often the result when a surge of boost felt like it was lifting the front wheels and pushing them sideways. Extreme understeer would make the out side front tire chatter across the pavement a very unsettling feeling but if you balanced steering input correctly on the exit, the Eclipse was extremely fast. Of course, all this brute force did take its toll on the brakes and tires, but it sure was fun!
Far from lithe and nimble, the GSX felt like it made its way around the track by getting the pavement in a death grip and bullying its way through the laws of Physics
Which more or less brings us to where we are today, returning the car to Mitsubishi. During its time with us. The Eclipse appeared at numerous event, including the 1997 SEMA show in Las Vegas, the 1998 SEMA Import Auto Salon and the 1998 Long Beach Grand Prix. Not to mention the numerous local drag races and car shows. With its wild graphics scheme (courtesy of Imagine It Graphics), the Eclipse excelled at attracting attention. Which, of course, was sort of the whole point.
So, we bid farewell to the Eclipse, impressed with its performance potential and with the fact that nothing ever broke, despite everything we threw at it (a worn clutch doesn’t count). What the future holds for Mitsubishi’s sporty coupe is truly unknown at this time. We’ve heard rumors that the turbocharged 2.0-liter motor will disappear with this particular model, replaced by the new 3.0-liter V6 found in the ’99 Galant. With 195 horsepower, this would not necessarily be a bad thing. On the other hand, we’ve also heard that the turbo motor may make a return. You can expect all wheel drive to bid a final farewell: Mitsubishi sells very few turbocharged models, and even fewer GSXs.
| What it Cost | |
| Suspension | |
| Springs: Eibach Pro Kit | $225 |
| Shocks: Koni | $576 (set of 4) |
| Wheels: Kosei Seneca 18 x 8 in. | $420 (each) |
| Tires: Dunlop SP9000 225/40ZR18 | $228 (each Tire Rack Price) |
| Engine | |
| Exhaust: HKS | $480 |
| Turbocharger Turbonetics T28 upgrade | $850 |
| Intercooler Pipe: Road///Race | S90 |
| Blow-Off Valve: GReddy Type S | $205 |
| Intake: K&N | $95 |
| Fuel Computer: Apex Super AFC | $369 |
| Turbo Timer: Apex | $99 |
| Boost Controller: Apex | $579 |
| Sound System: | |
| 3-disc in dash head unit: Alpine 3DE-7886 | $480 |
| Speakers: Alpine SPS-1326 | $80 |
| INTERIOR: | |
| Short Shifter: Pace Setter | $190 |
| Shift Knob: RAZO | $85 |
| Pedal Pads: RAZO | $77 |
| EGT Gage: Apex` | $211 |
| Boost Gage: Apex | $170 |

SCC Magazine – Project Eclipse – Interior Mods
Focus On The Cockpit
Sport Compact Car Magazine November 1998
By Dave Coleman
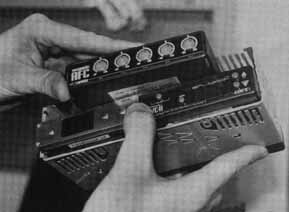
Over the last several months we have made several improvements to the Eclipse’s driving environment, most of which were overshadowed by out quest for power. The earliest change we made was to accommodate the Apex electronics we installed in our second update on the car (Project Eclipse GSX, January, 1998). Initially we had simply taped the Super AFC, AVC-R boost controller, and turbo timer to the underside of The dash. This only worked for about four hours, however, before we had to contend with electronic devices dropping onto our feet every few minutes when the tape let go. We wanted to mount all three devices in the dash, but with the double-DIN sized factory stereo/CD/cassette deck taking Lip all the room, there was nowhere for them to go.
The stock stereo took up too much room for our new electronics so it had
While the factory stereo is actually quite good, it was in the way. If we installed a standard, single-DIN unit, there would be plenty of room to mount our electronics, but we would have to give up some features of the factory stereo to make it work. It wasn’t a very hard decision, as we never used the cassette portion of the stereo. The change would also allow, I us to take advantage of some better audio options.
Competition Soundworks cut adapters to mount the Alpine speakers in the stock door locations.
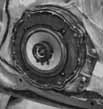
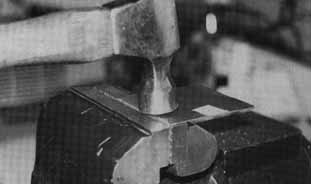
An extra stereo mounting frame was used to mount the Apex electronics, To fit the frame below the stereo, we had to cut the lip off the top of it. We used a air-powered cutting wheel, but if you don’t have one you’ll just have to get creative. The meat is relatively thin and easily cut.
Since the Eclipse didn’t have a CD changer, and we often end up driving the car long distances to events, we decided to go with Alpine’s 3DE-7886 three-disc in dash CD changer. it turned out to be a good choice. The amplified unit (35Wx4 channels) gave us good CD selection without eating up a bunch of cargo space with a changer (those long trips mean a lot of luggage in the Eclipse’s surprisingly large cargo space). And the unit was packed with enough features to keep even the most ardent gadget hound occupied for hours. Things like programmable preset address indicator, station title memory and automatic memory programming for the tuner, with 8X oversampling, a 1 bit DA converter, disc title memory and a host of other features we never, got to explore. We had Competition Soundworks in Cerritos Calif. install the CD Changer and a set of Alpine speakers in the doors.
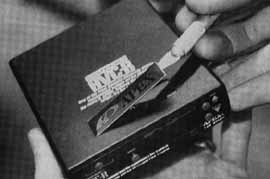
The Apex boxes were hot glued into the frame before being inserted into the dash.
We wanted to mount all three devices in the dash, big with the double-DIN sized factory stereo/CD/cassette deck taking. up all the room there was nowhere for them to go
To fill the hole left next to the AFC, we bent up a sheet metal block off plate,
We then peeled the Apex plaque off the top of the turbo timer and mounted it on the block-off plate.
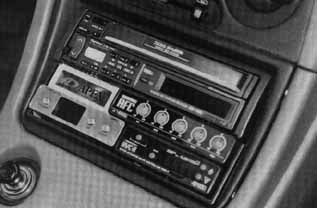
The new arrangement was definitely worth the work. The installation looks clean and well organized, and the Alpine stereo sounds great!
The CD changer was mounted in the top half of the double DIN hole to allow the CD cassette to shuffle without interfering with the shifter To mount the Apex electronics we used an extra mounting frame. Both the turbo timer and the AVC-R boost controller are quarter DIN sized, while the AFC is slightly wider. We could fit all three boxes in a single DIN slot with a small gap left next to the AFC. To mount each box, we simply used a hot glue gun to stick it to the frame, while the gap was filled with a sheet metal panel we cut out, and decorated with an Apex emblem we peeled off the top of the boost controller.
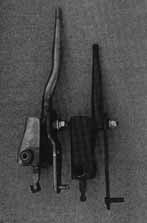
The Pace Setter shifter shortens shift throws by at shortening the rod above the pivot, and lengthening the rod below the pivot point,
Accessing the shifter can be difficult if you don’t know where to start. The first step is to remove the ash tray, there are some hidden mounting screws for the center console under here.
On other interior notes, the Eclipse’s cable shifter is rather clunky and imprecise. It also has a relatively long throw that makes fast shifting a little difficult. In an effort to solve this problem we installed a short shifter from Pace Setter. The short shifter both lowers the shift knob and changes the lever ratio between your hand and the shifting cables. This both shortens the shift throw and increases shifting effort. The shorter throws are definitely an improvement, but the increased effort makes shifting even more difficult. The shifter didn’t really feel any more precise-,,, either, as the sloppiness appears to be a result of the cables and the internal design of the transmission more than the shift linkage itself. When we later, installed a RAZO shift knob that was a few inches taller, the shift effort improved dramatically. Since the knob effectively brought the top half of the shift linkage back to its original length, the lever ratio was somewhere between its original value and the ratio provided with the stock, knob. Another improvement to shift effort came when we installed our Exedy clutch. The three-puck clutch disc has less rotational inertia than a fully faced clutch disc. and since the syncros have to accelerate or decelerate the clutch disc whenever you shift, less inertia makes the syncros work faster.
We also changed to Motul synthetic transmission fluid at the same time, which also helped speed shifting (since we did the clutch and fluid at the same time, it is impossible to tell which made the bigger difference). Shift effort while driving is nearly the same as stock now, but first and reverse are still much more difficult.
[RRE Note: We were not happy with the performance of either the Pace Setter Short Shifter or the Exedy Clutch, we do not recommend either one.]
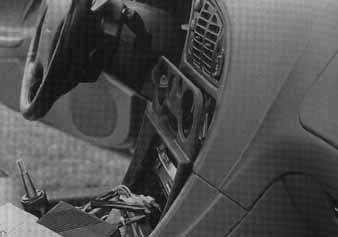
Next the trim panel over the ventilation controls must be popped off, Just get your fingers behind it and pull.
The RAZO shifter was originally installed for a show, as were a set of RAZO pedal pads. We were initially planning on removing them after the show, but when we discovered the improvement the shift knob made, we decided to leave it in place. Something similar happened with the pedal pads. Installing the pads not only makes the pedal surface larger and grippier, it also makes it closer to the driver, since the pads themselves are at least a quarter inch thick. Since most of the staffers driving the Eclipse on a regular basis are over six feet tall, nobody wanted the pedals any closer to them. The brake and clutch pedal pads came off almost immediately. The gas pedal pad, on the other hand, turned out to be very functional. The stock pedal is too small, too low, and too far from the brake pedal to be able to heel toe downshift. The pad moved the pedal just far enough to make the car much easier to drive. It my look a little funny, but having only the gas pedal pad in place worked perfect for our picky drivers
It may look a little funny, but having only the gas pedal pad in place worked perfect for our picky drivers
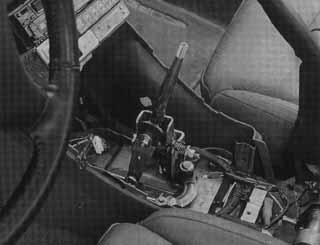
Once it is revealed, the shifter is fairly easy to replace
SCC Magazine – Project Eclipse – Part Five
by Dave Coleman
PHOTOGRAPHY: LES BIDRAWN, KEITH BUGLEWICZ, DAVE COLEMAN
A 28-Horsepower clutch? well sort of ….

Project Eclipse has been the recipient of a very successful series of modifications. From the beginning, nearly everything we did to the car yielded very positive results. That all stopped with out last installment (September, 1998).
As you may recall, our last series of modifications began with a Hahn Racecraft (HRC 3-inch downpipe and high flow catalytic converter. That piece increased airflow so much that the fuel system maxed out the stock injectors just trying to keep up. This lead us to install larger, 550-cc/min injectors from RC Engineering and a larger fuel pump from Road/Race Engineering. The larger injectors required that we adjust the Apex Super AFC (the AFC adjusts the stock air mass sensor’s output so the computer can be fooled into delivering the shorter injector pulses needed for the larger injectors), Being short on time, we made our adjustments quickly and largely by the seat of our pants (and with the help of an Apex exhaust temperature gauge). The result was a car that sounded cool, sucked down a lot more gas, and made exactly the same power as it had before this series of changes. We were confident,, however, that the only reason the changes had not made power was the sloppiness of our tuning.
Shortly after we discovered the lack of improvement, we took the car back to Mike Welch at Road/Race for a more careful tuning session. Welch has tuned numerous Eclipses with the Super AFC and has the procedure pretty well nailed down. First, he plugs a laptop computer equipped with OBD Tool software into the diagnostic plug under the dash The OBD Tool software not only allows you to read the fault codes from the OBDII system, and to reset those fault codes (thereby turning off that annoying “check engine” light), but it also allows you to monitor and data log many of the stock ECU inputs or outputs.
There are five knobs on the Super AFC, each offsetting the air mass sensor’s output at a particular engine speed (the AFC creates a smooth line between these points to establish an overall offset curve). The first knob, which sets the 800-rpm point, is adjusted by simply letting the car idle while monitoring the 02 sensor voltage with the OBD Tool software. With the knob adjusted properly, the 02 sensor’s reading should constantly cycle up and down as the computer operates in its self adjusting closed loop mode. Given the fact that the RC Engineering injectors are 23 percent bigger than the stock injectors it is surprising that the first knob is turned down only a few percent to idle properly
For the next two knobs, covering the 2400 and 4000-rpm points, Welch adjusts them by logging 02 sensor voltage at full throttle in fourth gear. Using a lower gear would not load the engine enough, nor would it allow the engine to be in that rpm range long enough to easily see what is going on. Ideally, 02 sensor voltage should be about 0.94 volts as seen on the OBD II Tool. Under these conditions; ours was 0.98 volts when we brought it in-way too rich, according to Welch.
Finally, the last two knobs (5600 rpm and 7200 rpm) are adjusted by watching exhaust temperature at full throttle in fourth gear. It doesn’t take a rocket scientist to realize that watching the exhaust temperature gauge at the top of fourth gear requires either a closed race track or a trip to Montana with a notebook full of explanations for why 130 mph is reasonable and prudent. According to Welch, the exhaust temperature should be about 600 degrees C (about 1650 degrees F) at high rpm under maximum load. Before Welch made the adjustments, exhaust temperature never went over 800 degrees C, another sign that the engine was running too rich.

Our new Exedy clutch combines a three-puck cerametallic friction surface with a sprung clutch disc to provide incredible gripping power and heat resistance with reasonable driveability.
[RRE Note: we were not happy with the performance of the Exedy clutch and do not recommend it]
Even after tuning the AFC, Welch felt the car still wasn’t running right. No matter how he set the boost controller, boost pressure would always drop to about 15 psi by redline. With a stock turbo, this is to be expected, as it can not move enough air to make more boost at high-rpm. Welch’s experience with the Turbonetics-upgraded T28 turbo we were using, on the other hand, told him there should be more boost available. After investigating a few dead ends, the OBD Tool again offered the answer. By data logging speed and rpm during a hard fourth-gear pull, Welch noticed that instead of speed and rpm increasing in lock step as they should, the rpm line would start climbing away from the speed line. The only explanation was a slipping clutch.
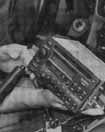
The Road/Race flywheel has four pounds of iron machined away, The majority of that weight was removed from the outer portion of the flywheel where the change can make the most difference. The stock flywheel on the right shows how much metal was removed.

A slipping clutch explains a lot about our experiences with the Eclipse. First, the loss of boost came from the loss of load. Spinning the clutch is easier than accelerating the car, and the lighter loading on the engine reduces the amount of boost it builds. A slipping clutch could also explain some of our inconsistent power measurements. From one installment to the next we have noticed some strange variations; in the power output of our all-wheel drive Eclipse as measured by our Vericom. Some of the variation could have been caused by differences in temperature affecting intercooler performance, or by the ECU switching to extra-conservative fuel and timing maps as weather conditions changed. Now we can add a slipping clutch to the list of things that could be changing power output at the wheels from run to run.
Given our Eclipse’s tremendous power, immense weight (over 3500 pounds with a driver) and all-wheel drive grip, a slipping clutch is no surprise. In fact, you might call it a design feature. In most cars, the clutch is designed to slip before driveline parts start to break- This is especially true of all-wheel drive Eclipses. With 210 horsepower and all wheel drive, there is a natural tendency for every common-sense-challenged yahoo who gets behind the wheel to try and spin all four tires. To save countless thousands of dollars in warrantee claims resulting when these same yahoos find out the transmission isn’t up to the task, the clutch in the GSX was designed with two safety features: An overall capacity a little on the low side, and a damper in the clutch’s hydraulic system that slows the clutch’s engagement when that yahoo makes his or her attempt. While the damper was not getting in our way (the clutch slipping problem only occurred at high boost, well after the clutch was fully engaged) the low capacity of the stock clutch was a problem.
With 210 horsepower and all wheel drive there is a natural tendency for every Common sense challenged Yahoo who gets behind the wheel to Try and spin all four tires

Now that we have learned that our stock clutch has been slipping for an indefinite period of time, we can’t be sure how accurate any of our previous runs were. Power output may have been lowered by the clutch on any of our previous runs. According to the now questionable readings of our Vericom, the new clutch, along with the downpipe and injectors, gave us a huge gain of 28 horsepower. Based on comparisons with rated flywheel horsepower versus Vericom horsepower on our Sentra SE-R (Technobabble, May ’98), we estimate the Eclipse’s flywheel output to be at least 294 horsepower.
Before installing a higher-capacity clutch, we made some 0 to 60 runs to get some objective idea of how much of a difference the new clutch was making. Launching a turbocharged all-wheel drive car is a challenge. While the tremendous grip can give you a serious advantage off the line, getting the car to leap off the line without either bogging before boost is built, or belching the transmission out the bottom of the car is a challenge. The fastest launches came by bringing the engine up to about 3000 rpm, and rapidly feeding out the clutch and feeding in the gas at the same time. Using this technique we were able to pull off one impressive 5.63-second run, followed by the distinctive stench of clutch flambé. The heat generated by that one launch was all the clutch could handle. After that one clutch-smoking run, we were never able to pull off another sub-six second pass.
Our new clutch would have to be significantly stronger, but since the Eclipse is still a street car driven almost every day, we needed it to provide good driveability without excessive pedal effort or chattering during engagement. Our decision to try a three-puck cerametallic
Exedy clutch may seem like a surprising choice oven our requirements. In most cases such a clutch would grab so suddenly and chatter so badly that it would be absolutely undriveable. Street clutches are typically designed with a sprang disc, meaning that the center of the clutch disc-where power is delivered to the transmission-is isolated from the outer edge of the disc-where the disc is clamped by the pressure plate by several springs. These springs smooth the clutch’s engagement. Most cerametallic clutches are designed with a solid disc simply because most sprung discs can’t handle the higher torque load. While it seems like the obvious solution is simply to build a stronger sprung disc, most performance clutch manufacturers make their clutches by modifying stock parts. Building a whole new disc would make the parts prohibitively expensive. Building performance clutches by modifying stock parts certainly works, but it does place some limitations on the design. Exedy, on the other hand, is a OE clutch manufacturer (Exedy actually owns Daiken Clutches), and they therefore have the facilities to be able to engineer and build clutches that most low volume manufacturers would not be able to. Hence their claim that their three-puck cerametallic clutch could be used on a street car.
The OBD Tool software Is used to monitor engine functions as tuning adjustments are made. The jagged line here is O2 sensor voltage cycling up and down as the computer self-adjusts fuel mixture at idle. The 800-rpm knob on the AFC must be set within the proper range to allow the computer to do this.

Here the OBD Tool is showing the data logged run that first revealed slipping clutch. The line on top is RPM, while the line on the bottom is speed. Both should increase together, but because of our slipping clutch, the rpm increased more than the speed.
That sounded like the perfect solution, so we decided to put their claim to the test. The Exedy clutch has a clamping force of 880 pounds compared to the stock clutch’s 700 pounds, but because the three-puck design concentrates that force into much smaller area (only three pucks instead of a full disc) the pressure on the friction surface is event higher. The result is an overall torque capacity 63 percent higher than the stock clutch.

When Road/Race installed the clutch, they suggested installing a lightened flywheel as well. While the Road/Race flywheel is only 4 lbs lighter than the stock one (14 lbs vs. 18 lbs), most of that weight has been removed from the outer edge of the flywheel where it can make the most difference. Since rotational inertia goes up with the square of the distance (in other words, removing weight from the outer edge will make four times as much good as removing it from halfway out from the center) where you remove weight makes much more difference than how much you remove.
After installing the clutch and flywheel, Welch drove the car for a day to help us break it in. Initially, he reported, the clutch did chatter and grab rather severely, but as the clutch broke in, engagement smoothed considerably Only a few days of normal driving were required before the clutch began to behave in a civilized manner Pedal effort is quite high, even though spring force is only 25 percent higher than stock. The fact that the stock clutch’s effort is already quite high makes 25 percent a significant difference. The clutch is also slightly grabby as any clutch this strong has to be, but overall, if you can cope with the clutch on an early ’80s Porsche 911, you cope with this one.
Next came the tests. With the clutch broken in, we returned to our 0-to-60 mph test. Launching the car is not really any easier with the stronger clutch-engage it too suddenly and you can still bog it quite easily, but now excessive slippage will not overheat the friction material. Much like brake pads, an organic clutch facing material will tend to “float” when overheating causes resins in the facing to bum off. The cerametallic facing has no such problem-heat has very, little effect on our new clutch’s performance. Excessive slippage is still a bad idea, though, as the clutch will tend to grab and chatter if you launch at too high an rpm. Once we found the sweet spot, though, the all-wheel-drive Eclipse launched with such ferocity that it could actually chirp the front fires.

From the first 0 to 60 run it was clear that the new clutch was not slipping at all. Previous runs required either you either to shift to third gear or push the engine a few hundred rpm past the redline before reaching 60 mph. With the new clutch, redline took the car all the way to 68 mph-proof that the stock clutch was slipping at several hundred rpm even in second gear!
Our best 0 to 60 run was an impressive 5.54 seconds, an improvement of almost a tenth of a second. Even more significant was the fact that while the stock clutch could only handle one good run before overheating, the Exedy clutch withstood run after run, back to back, with out ever running longer than 6 seconds. in fact, our best run was on the third attempt.
Once we found the sweet spot, though, the all-wheel drive Eclipse launched with such ferocity that it could actually Chirp the front tires.
The final test was to do some second gear pulls with the Vericom to determine our power output. This would be our first chance to finally evaluate the performance of the HRC downpipe and catalytic converter and the 550cc/min RC Engineering injectors, as well as the Exedy clutch and Road/Race flywheel, and the fine tuning work performed by Road/Race. To our great relief, peak output was up 28 horsepower. This is especially impressive when you remember that we are still using the tiny stock intercooler. The peak power reading given by our Vericorn is 210 hp, but as we discovered in our dyno comparison test several months ago (Technobabble May, 1998), the Vericom’s readings are consistent and precise, but quite a bit lower than a Dynojet. Our test of a 140-hp Sentra SE-R registered only 100 hp on the Vericom (and 117 hp on several Dynojets). Since our Eclipse’s output is 2.1 times that high, we can confidently estimate flywheel output at a bare minimum of 294 hp.
In reality, the GSX’s all-wheel drive system has to have higher driveline drag than a front wheel drive SE-R, so real flywheel output must be well over 300 hp.
We have seen this phenomenon before, but it is always interesting to see it happen. The HRC downpipe and cat, and the RC Engineering injectors obviously did their job and did it well, but simply slapping them in place and hoping for them to work won’t cut it. An engine is an amazingly complicated system and whenever you mess with one variable, you invariably will affect another one. in our case the increased air and fuel flow had to be properly adjusted to create power, and then the clutch had to be strengthened to actually harness that power. People are constantly asking us how some combination of parts will work on their car. Results like this are the reason why our answer is almost always “it depends”.
SCC Magazine Project Eclipse – More boost!
Sport Compact Car Magazine, October 1998
by Keith Buglewicz
PHOTOGRAPHY: LES BIDRAWN, KEITH BUGLEVVICZ
We Continue or Quest for Elusive Extra Boost
Our Project Eclipse has come a long way since we first got the car back in May of last year. Our first upgrade was to the suspension and throttle response. The suspension improvements-four Eibach springs and four Koni adjustable struts-worked like a charm, calming the sometimes-wallowy ride of the Eclipse. To fill in the vast, vacant wheel wells, we added 18-inch Kosei Seneca wheels and Dunlop SP9000 tires. The engine upgrades consisted of a cat back exhaust, an intake and a better intercooler pipe, and worked surprisingly well to give the Eclipse a measured gain of 32 hp. Next, we added an Apex electronic boost controller and AFC fuel computer in a quest for more boost. They helped, but we were limited by, the inefficiencies in the stock turbo. We took care of that with a new turbo that had been thoroughly massaged by Turbonetics. The improvement was drastic.
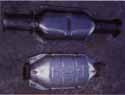
The differences in the stock catalyst and Random Technology catalyst supplied by HRC are dramatic. The overall shape is the same; however, the inlet and outlet pipes on the Random catalyst are monstrous compared to the Stock unit
But there was still more work to do. With the bigger turbo, the stock fuel injectors were at maximum capacity, often running at over 90 Percent duty cycle at higher revs (the Apex AVC-R boost controller can read injector pulse width). It was clear that if we wanted to run more boost, we needed more fuel. in addition, we wanted to complete our exhaust system modifications with a three-inch downpipe and catalyst from Hahn Racecraft (HRC).
The cliché says a chain is only a strong as its weakest link, and that was the case in our Eclipse’s exhaust system. The stock turbo outlet had been ported by Road/Race Engineering when the new turbo was installed (see “Project Eclipse”, March 1998). We wanted to find out how much of a difference installing a full three-inch exhaust system would make on the car, however. There were few problems on the intake side, with a free-flowing air filter, blockage-free intake pipe and a round (instead of kinked and flattened) intercooler-to-throttle body pipe. However, the engine couldn’t quite get the exhaust out properly because of the puny catalyst inlet and outlet, and the small pre-cat half of the exhaust system.
HRC offers an excellent selection of Eclipse performance parts, and their new 3-inch downpipe caught our eye; a beautifully crafted stainless steel piece with nice straight welds, a built-in flex joint and all fittings and fasteners needed to get the job done. The catalytic converter was from Random Technology and features a 3-inch inlet and outlet. This contrasted with the stock cat, which actually necked down a little from the stock 2.25-inch pipe, causing a major flow restriction. The idea behind the HRC system was it should be used to modify an existing 3-inch cat-back system. In other words, you have to cut off part of the existing performance exhaust system on your Eclipse and weld on a new flange to use the HRC system; something of an advanced procedure. Most cat-back exhaust systems for the Eclipse start out at 2.5-inches so this is the only way a 3inch downpipe and cat can be added. To do it properly, a good lift, saw and welding tools are needed. In other words, take it to a professional.
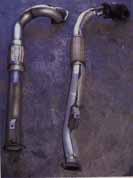
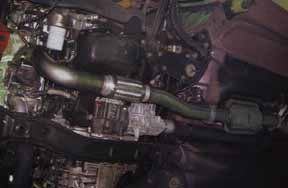
Note how the stock downpipe chokes down considerably after the cast iron collector. Keep in mind that the majority of the width shown by the stock system is heat shields the HRC piece is a true 3-in. pipe.
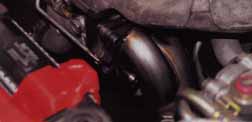
The easy part was getting the HRC pipe in part was reaching up into the tight confines of the engine compartment and bolting the pipe to the flange of the turbo.
You can see why getting the pipe on was so difficult. Note there are two more bolts not visible here, HRC even tapered one bolt (under the waste gate pipe) to make getting it in a little easier, Regardless, it was a tight squeeze. With the pipe in place, changing the oil filter is also a little more difficult, but the pipe was carefully designed to give exactly enough room to get the filter out.
Attaching the new catalyst to the existing exhaust system was supposed to he straight The flange from the old system would he cut off, the new flange welded on, and the whole shebang would just belt right together It didn’t quite happen that way
Once again, we utilized the talents of the technicians at Road/Race Engineering in Huntington Beach, Calif., for the installation. Installation of the new pipe appeared to be straightforward … at first. The three-inch downpipe was a tight fit, and only after some serious grunting, groaning and a series of words unprintable here did we finally get the pipe in place. The fault didn’t lie with the downpipe itself; there just isn’t a lot of room to work in the Eclipse’s engine compartment. Installation necessitated removing all the heat shielding from around the turbo, and removing the radiator fan as well for extra clearance. The stock downpipe was extracted as one piece from the car, and was relatively simple to remove. The HRC piece, on the other hand, proved difficult. The stock cast iron collector South of the turbine is physically much smaller than the HRC piece, and does not incorporate the long external waste gate runner the HRC pipe does. As a result, getting the HRC pipe to fit required a little extra effort. HRC is aware of the tightness of the compartment, but aside from supplying a special tapered bolt to clear one of the tightest spots and some hints on getting their pipe in, there is little they can do.
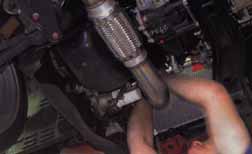
The second part of the system proved to be more challenging than the first. We had to cut off a considerable length of pipe to get to the three-inch portion. This caused a cascade of problems. Note the dogleg bend in front of the resonator; this had to be custom fabricated later.
Mike Welch from Road/Race utilized a three-inch resonator to replace the one cut off in our exhaust system surgery. He also fabricated the necessary dogleg bend from spare three-inch pipe. To keep the OBDII system happy-Mike cut the oxygen sensor mount off the old exhaust and welded it onto the new one. The new system looked considerably beef ier than before. Note that although there were some tight clearances, nothing rubs against the bodywork, and the car only scrapes on very high center bumps that would give most lowered cars trouble,
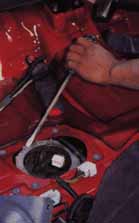
With the exhaust system in place, it-was time to replace the fuel pump and injectors. The pump was first. After the rear seat was removed, the access panel for the fuel pump was unscrewed and removed.
Attaching the new catalyst to the existing exhaust system was supposed to be straightforward. The flange from the old system would be cut off, the new flange welded on, and the whole shebang would just bolt right together. it didn’t quite happen that way. Everything seemed to be going smoothly until we realized the combined length of the HP( pipe and catalyst was too short. Once again this had little to do with the HRC ‘tern and more with the exhaust system we already had on the car The cat-back exhaust we used on the car didn’t flare out to its full 3-inch diameter until about 2 feet past the catalyst, which was where we made our cut. This extra length was too far for the HRC piece to span, eve with the long pipes on the ends of the Random Technology cat. So, we had to improvise. like any good tuner shop, Road/Race had lots of extra parts on hand. Among them was a sizable length of 3-inch steel tubing that was easily cannibalized for exhaust system duty. We also decided to add a 3-inch resonator to take the place of the one we had cut off the cat-back system (since the car is often driven long distances, a droning exhaust was the last thing we wanted). Mike Welch carefully measured the length needed and cut off the piece needed to make the system fit. Once again, we seemed to be on track until another problem reared its head.
Although the extra length of pipe and the new resonator were fine length-wise, they just weren’t lining up with the catalyst. The piece we had cut off incorporated a small dogleg bend. The bend compensated for difference of about a half inch in our modified system.
Since no amount of straining would bring the two together, Mike again came to the rescue by cleverly cutting the short length of pipe in front of the resonator. He was then able to line up the two pieces at last. Mike also cut a new hole for the stock post-cat oxygen sensor, keeping the OBDII system happy. Once the pieces were finally cut to fit, they were spot welded in place, and finally seam welded.
Despite the difficulties, the Frankenstein exhaust system looked terrific under the car. The extra welds and bends did nothing dynamically to restrict flow, and we now truly had a 3-inch “turbo-to-tip” exhaust system. The car now sports a deeper, richer exhaust note at idle that turns into a loud, angry blat at full throttle. We should point out that the exhaust does occasionally scrape, but only over high-centered clearances that would challenge almost any lowered vehicle.
The seat-of-the pants results were pretty good. Although the car didn’t need FAA certification, it certainly had better throttle response, along with better turbo spool up, which was mainly what we were looking for The differences in top-end power felt incremental at best, though, with no immediately noticeable difference at the high end of the tach. What was immediately apparent was that the system was flowing a lot more air.
How could we tell? A blast to redline on a cold day would cause the fuel cut to step in after the computer noticed the injectors hitting nearly 100 percent duty cycle. After a few of these incidents, the check engine light came on as well. Since this increased fuel and air flow didn’t seem to be accompanied by a substantial boost in high-end power, we theorized that the computer was over-fueling the car. To keep the engine safe from detonation, the computer was going dead rich, too rich to make any more power. The other hint that this could be the case was the blue faces of that followed the Eclipse in traffic raw gas smell was a little strong.
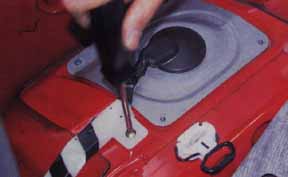
The official Mitsubishi tech manual prescribes a special tool to remove the large retaining collar that holds the fuel pump in place. Road/Race discovered another equally effective-if less elegant-way to do the same thing using much more common tools,
The electrical connection for the fuel pump was disconnected. In order to depressurize the fuel system, Road/Race turned on the car with the fuel pump disconnected. The car simply used up the fuel in the lines and died, They then disconnected the battery before proceeding. Even though the fuel system Was depressurized, there was still gasoline in the lines. If you are doing this procedure yourself, make sure You have something handy to catch the excess gasoline that spills out when the fuel lines are disconnected.
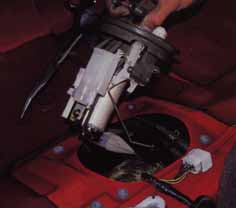
The fuel pump, float and sender all came out as one assembly. You may want to cover the open hole to the gas tank with something to prevent debris from falling in.
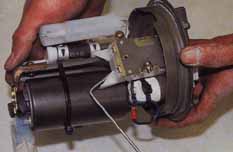
The replacement pump is physically much larger than the stock unit, and requires a lite modification of the various brackets to properly mount. Installation of the pump back into the tank is the reverse of removal.
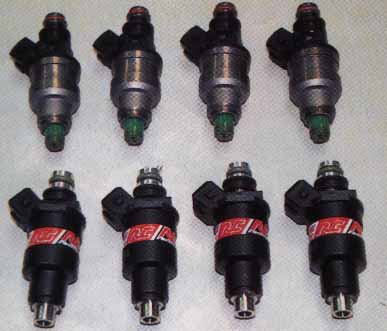
To replace the fuel injectors, all fuel lines to the fuel rail were disconnected, the injectors were unplugged and the rail was removed. If it can be removed with all four injectors attached, all the easier for the installer. Note the ‘A’shaped retainers above the plug for each injector. These need to be ground down to fit the new injectors.
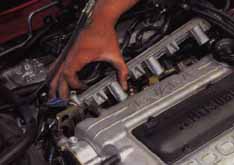
The RC’s injectors we chose flow 550 cc/min over the stock 450 cc/min (a 23 percent increase in capacity).
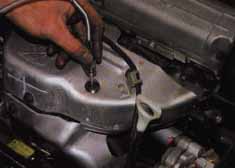
To monitor how much fuel we were giving the engine, we installed an exhaust gas temperature gauge from Apex The first step was drilling a hole for the temperature probe in the exhaust manifold. The hole should be as close as possible to the exhaust port without interfering with it. Mike actually drilled the hole in the manifold while the car was running, blowing any shavings back out the hole instead of allowing them to fall down into the turbo.

Carefully fiddling with the Apex AFC, we dialed the air flow meter input back four percent across the entire range (by simply turning each knob back four ticks). This dramatically improved power, throttle response, odor, and caused the check engine light to go back off. We were hesitant to tune any further, though, since we had no Exhaust Gas Temperature (EGT) gauge to see how our tuning was going (exhaust gas temperature is a good indicator of fuel mixture.)
Cold mornings still brought the injectors close to 100 percent, and we were eager to try more boost, so we made a call to RC Engineering in Torrance, California, for a set of new 550-cc injectors. RC Engineering is one of the best-known names in fuel injection technology. Its injectors are all flow matched so each injector in a set flows as close to the same as is possible. in an unusual twist, Russ Collins (the “RC” in “RC” Engineering) does not concentrate as much on fuel atomization as one would think. We all know what we think an injector spray should look like-a fine mist that sprays evenly from the tip of the injector. However, Russ showed us an injector equivalent to those provided for our Eclipse on his custom strobe-light-equipped spray observation station.
What we saw was surprising … no light mist, but a steady stream of fuel (well, test liquid, but you get the idea) that would shoot directly into the combustion chamber. Russ says that the atomization takes place in the turbulent environment of the combustion chamber, and that it isn’t necessary for the injector to do the job. The narrow stream is less likely to condense on the walls of the intake port, making the fuel mixture more consistent.
The probe simply screwed into position, with the lock nut keeping it in place.
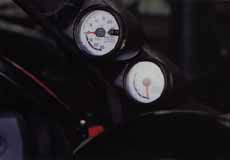
We mounted the EGT under the boost gauge in the Eclipse on the A-pillar. Road/Race supplied us with a double pillar mount to replace the single pillar mount. Like the first one, it had to be modified to fit the slightly oversized Apex gauges.
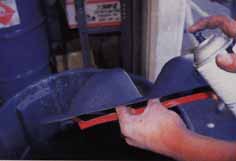
To give the piece a more stock appearance, Road/Race also painted it the factory gray of the rest of the interior.
The result was an ergonomic placement of the gauges right in line with the driver’s sight.
Installation of the fuel injectors was another reasonably straightforward procedure. Because it involved working with raw gasoline, it was a good idea to disconnect the battery to prevent any sparks. The entire fuel rail was removed, the new injectors were put in place, and the rail was popped on. Well, almost. Because the RC injectors have a slightly different connector location, the stock Mitsubishi rail had to be trimmed slightly. Simply a matter of grinding off some excess metal on the rail around the plug for each injector proved to be minor surgery.
With bigger injectors, the stock fuel pump would not be up to the job of providing adequate fuel pressure, so Road/Race also installed a larger Denso fuel pump.
The fuel pump was an in-tank unit, which meant removing the rear seat to get at the access hole on top of the tank. Once the pressure was relieved from the system and all hoses and connectors were removed, the large plastic ring holding the fuel pump in place was removed. The pump was removed as an assembly with the float for the fuel gauge. The pump itself was a metal cylinder about 4 in. long. The Denso replacement unit was substantially larger, and required a bit of modification to get onto the stock bracket.
With the larger injectors, the engine would automatically run way too rich, so we would have to use the AFC to dial in the fuel mixture. With this much fuel mixture fiddling, we absolutely needed an EGT gauge. So, we turned once again to Apex for an exhaust gas temperature gauge with a white face to match our boost gauge. Mike Welch of Road/Race showed us a good trick for installing the EGT probe in the exhaust manifold. To install the probe, you must drill and tap a hole in exhaust manifold. To prevent metal shavings from dropping into the manifold, and subsequently into the turbo, Mike drilled the hole while the engine was idling. This way, the exhaust blew the metal shavings out the hole and saved us a lot of worries.
As simple as this technique seems, Mike was quick to caution the inexperienced not to try it at home. it takes a great deal of finesse and practice to get the procedure down right one wrong move and a big piece of metal could fall into the turbo, with disastrous results. The safe way to do it is to remove the manifold altogether.
Once the hole for the sensor probe was drilled, it was relatively simple to route the lines to the gauge, which we mounted on the driver’s side A-pillar next to the boost gauge. mike tells us that the exhaust temperature should be 900 degrees Celsius at full throttle when everything is operating smoothly. Getting the temperature to that level involved tuning our gas flow with the Apex AFC fuel computer This procedure takes a while, and can be disastrous if done wrong. If in doubt leave it to professional tuners like those at Road/Race.
Initially we rough-tuned the car to run smoothly, and keep the exhaust conservatively cool. Tuned this way, the car made the same power it did before we did all this work. At the time we went to press, Road/Race was in the process of tuning it more precisely in the hopes of getting better power results. As we have observed before, the stock computer is getting very conservative about fuel and timing. Though you can tune this out somewhat with the AFC , you are only adjusting the air flow meter input to the computer, not adjusting the output. To really get things right, the ECU has to be re-programmed to remove the conservative fuel and timing maps. We plan to have this done, but in the mean time, we want to see exactly how well the engine can be tuned with the AFC. With the AFC tuned conservatively, the HRC downpipe and cat and the bigger injectors have only gained us responsiveness and status in the parts hanger’s club. The tuning step will be critical to making these mods worthwhile. The results of the tuning, however, will have to wait until the next installment.
SCC Magazine – RRE Project Eclipse Intro
We have been working with Dave Coleman and josh Jacquot @ SCC Magazine on the build up of their new Eclipse project. The articles are starting to come out. Here is the introduction to the series.
Introducing Our Newest Project:
’97 Eclipse GSX
Sport Compact Car Magazine – May 1998
By Dave Coleman

Think back to when you were in high school. There was probably a girl back then who over the span of one summer transformed herself from cute wallflower to righteous babe. Maybe at the end of her sophomore year, you noticed her, but she was still somewhat awkward. Cute, but in a little kid kind of way. Then, the first day of her junior year, she came to class dressed to kill. Her hair was styled, her dress was short, her glasses were replaced with contact lenses. After one look, those teenage hormones were pumping, and you wonder how you ever overlooked her before. The same transformation has taken place with Mitsubishi’s Eclipse. Last year, it was a cute car. A solid performer, don’t get us wrong, but with styling that presented a smiling face to the world. The Eclipse is all grown up now, with a revised nose and tail moves the car’s attitude from happy to pissed off.
While Mitsubishi changed the styling of the Eclipse to something more aggressive-and more in tune with its performance intentions-it was smart enough, to leave the good stuff alone. Which means the 210-horsepower turbocharged engine, all-wheel drive system, limited slip differential and limpet-like grip that have made the Eclipse a favorite for those tight, twisty roads we all adore are still there for us to enjoy and improve on.
Our goal for the Eclipse is not to build a drag racer, but an all-around performance car that will be equally capable on the street and on the track. We will take advantages of the Eclipse’s inherent strengths while improving on its weaknesses. Be assured that although drag racing is not the goal, more power definitely is. And you will be informed of every step of every screw that is turned on our project, Along with our sister publication, Sport Compact Car, we will show you the best ways to extract more power from the Eclipse, regardless of your budget. Naturally, big power gains cost more money, but we’re aware that not everyone has NASA-sized budgets for their own cars, and there will be plenty of information on how to improve the car’s performance without taking out a second mortgage. Keep your eyes open for our next issue, for our first installment of Project Eclipse.
Peak Performer – Street Power Magazine 8/97

One of the most prestigious rallies in the world is the Pikes Peak Hill Climb held in Colorado every July 4. Its grueling 156 turn course stretches across 12.42 miles to the summit at 14,110 feet. At that altitude, the air is thin enough to make it difficult for humans to breath. you can imagine what it does to cars.
Conquering the Peak is no simple task, and to do well takes a combination of experience, skill and determination. Road/Race Engineering from Huntington Beach, California has been to the Peak and come away as record holders. In 1996, Kristof Huszti’s Mitsubishi Eclipse Turbo, prepared by Road/Race Engineering, took the two-wheel-drive record away from Rod Millen, who had set it in a Hyundai Scoupe a few years earlier. Huszti’s time of 13:04.03 was 12 seconds ahead of Millen’s and a significant in his – and Road/Race’s.

So what do the performance experts at Road/Race do when they’re not hill climbing?
The white Eclipse you see here is a good example. Owned by Mario Loria of Westminster, California, it at first appears to be a lesser, slightly warmed-over Eclipse. Obviously lowered, with nice wheels and tires, one could assume those and the GReddy exhaust were the only mods made to this particular GSX

Obviously lowered, with nice wheels and tires, one could assume those and the GReddy exhaust were the only mods made to this particular GSX. But there is a visual clue to more power under the hood in the form of small red, silver and black stripes on the rocker panel. Not an extraneous decoration, these are Road/Race’s colors, and are the only hint modifications to this car far surpass the superficial.
Mario bought his Eclipse after learning the aftermarket potential of the vehicle. After his purchase, he contacted Mike Welch at Road/Race and work began. The first stage was simple enough: The stock air box was swapped for a K&N performance air filter, and exhaust flow was freed up with a GReddy cat-back system.

The next stage consisted of slightly more involved modifications. A GReddy S-type brow-off valve was substituted for the stock unit (which are notorious for leaking), and allowed higher maximum boost. A manual boost controller was installed in the cockpit and a GReddy graduated white-faced boost meter was mounted on the A-pillar.
But it still wasn’t enough. The stock intercooler on the Eclipse is very small, and tucked in front of the right front wheel. This was removed and replaced with a larger, more efficient unit in the same location. Bigger intercooler pipes were fabricated by Road/Race. The bumper was modified to allow more air into the intercooler, and the fender well liner was slotted to allow air to exit more quickly, further enhancing the efficiency of the intercooler. Because the engine was getting more boost and therefore more fuel the ignition was upgraded slightly with Magnecor 8.5mm spark plug wires and NGK racing plugs to help avoid detonation when the boost was cranked up.

The next step involved chassis modifications to help improve chassis stiffness and therefore handling. Road/Race installed their upper strut tower braces in the front and rear, supplementing the front with an extra bar that connected the two lower strut mounts. With more power comes higher speeds, along with an increased awareness of safety. Schroth harnesses were installed as a result. Finally, a turbo timer was installed to keep the turbo from cooking itself.
By this time, the stock turbo was stretched to the limit. Road/Race substituted in a much larger TD05-16G Mitsubishi turbo, which provides about 20 pounds of boost. The compressor housing and exhaust housing were both ported along with the exhaust manifold to maximize exhaust flow. Since the bigger turbo was capable of much higher boost than the stock unit, a GReddy PRofec fuzzy logic boost controller was installed to keep better track of boost. An air fuel meter was also installed in the cockpit to keep Mario apprised of his engine’s condition.

The suspension setup was proving woefully inadequate for the kinds of speeds the Eclipse was capable of. Road/Race modified a set of GAB Super HP shocks to be used as an adjustable coil-over setup. Race springs were modified for more travel, and TSW Hockenheim R wheels wrapped in 225/45ZR-17 BF Goodrich tires were put on all four corners. The brakes were supplemented with Porterfield carbon-Kevlar pads and stainless steel braided brake lines.
By now, the stock clutch had met its match, and was replaced with a Clutch Masters full-face Kevlar clutch and pressure plate. The in-tank fuel pump was upgraded to a higher-flow unit.
Because the car is all-wheel drive, it is impossible to dyno. [2011 note… we are talking 1997 So Cal with no AWD dynos available at the time :-P ] However, based on front-wheel drive cars with similar modifications, Mike from Road/Race estimates power in the 320-hp range. More importantly, the car is not unusable for the street. The ride is firm, but hardly bone jarring. Although the bigger turbo does take a little while to spool up, its not as leggy as we expected.
And when it comes on, watch out. The car launches ahead like it was fired out of a slingshot, racing to red line as fast as you can shift. Mario says he wanted a high-performance supercar he could drive every day. With their Peak performance to work from, Road/Race delivered.

Sport Compact Car Magazine – From The Cockpit – 1994
Sport Compact Car Magazine 1994 – Reprinted with permission
By Mitch McCullough
We were halfway through the eighth stage of the Lake Superior PRO Rally and things weren’t going so well. A misfire in the engine, caused by a faulty throttle position sensor had reduced our power. Then a problem with the clutch linkage made shifting difficult. So I wasn’t too surprised when a Mazda 323 GTX piloted by a fast local driver started catching our 323 GTX.
Our PRO Rally effort had been going extremely well up to this point. I had bought the partially prepared 1988 Mazda 323 GTX just before the 1993 season started, and codriver Scott Webb and I had won the 1993 California Rally Series championship. We had raced against some strong competition and it was the first time in the 18 year history of the series that a driver had won the championship in his rookie year. Webb and I were each named Rookie of the Year.
We went on to clinch the 1994 SCCA Southern Pacific Divisional Championship, which starts and ends on Labor Day. This title earned us an invitation to compete against Divisional champions from around the country at the Press On Regardless PRO Rally in Michigan’s Upper Peninsula, a vast wilderness of deer, trout and the kind of dirt roads all rallyists dream about.
This year, “the oldest, meanest, toughest” rally in America was renamed the Lake Superior PRO Rally. The Detroit Region SCCA, which had organized the Press On Regardless for 47 years, opted to pass the event on to the more strategically located Lake Superior Region, but retained the POR name for a road rally.
Despite the name change, it was the same event with many of the same dedicated workers and the same phenomenal roads. This year’s rally comprised 165 miles of special stages with another 288 miles of transits.
Stage Eight, called Far Point, began as a fourth and fifth gear run through the dark forests. The powerful driving lights filling our mirrors were mounted on the GTX driven by Craig Sobczak of nearby Marquette Mich. Our clutch would not fully disengage, so shifting was difficult. I was staying in fourth gear, lugging out of the slower corners and not shifting up to fifth on the longer straights, trying to avoid damaging the new close ratio gearbox. We had decided to simply drive for the finish.
It was a dark, rainy night and there was still a long way to go. I had lost my enthusiasm for the high speed stages. “You were driving like an old lady,” Webb said later.
When Sobczak got close, I turned on the right blinker and moved toward the right side of the dirt and gravel road, slowing to 70 mph to let him by. But watching Sobczak throw his GTX through the high speed corners inspired me to go faster. “This is like road racing,” I shouted.
Still, Sobczak was pulling away, dropping momentarily from sight around a bend. On the next straightaway we saw that his left taillight lens was missing and the gap between us had narrowed. Then we saw some tracks in the road where someone had skidded toward the ditch. “He went off and tagged the bank!”
Sobczak had slowed only slightly, but we had turned up the wick and cut our distance. Then Webb called an acute right hand corner where we turned off the smooth county road onto a muddy, slimy trail that went up a hill. A crowd of spectators had gathered, standing behind a yellow banner to witness this challenge.
As Sobczak turned in, his 323 bogged in the muddy turn. Seizing the opportunity, I turned inside and went by him, slinging mud in all directions, and accelerated away. Cameras flashed, the crowd cheered-this was racing!
The path we were now on was composed of the slipperiest mud I’d ever seen. Suddenly, I was switched on and the car seemed to be working much better at the lower speeds. We were shifting from second to third and back again, grinding gears, braking in the muck for the tight turns, the car fighting every change of direction as we squeezed through the trees on the narrow path, grappling for grip. We pulled away from Sobczak and when we finished the stage we were ecstatic. We knew we had lost the stage to Sobczak, but we felt as if we had won the race. It was the highlight of the event.
We failed to press on, however. On the next stage we hit a big rock that cracked the sump, draining our engine’s life blood and ending our race through the dark north woods. Veteran John Buffum won the rally in Paul Choinere’s Audi Quattro. Meanwhile, Rhees Harris from Vemmont beat us to take the overall Divisional driver’s title in the Open 4WD class.
I was surprised at my lack of disappointment over failing to finish the event. It had been a great season and we had prepared well, given our meager budget. In nearly two seasons of PRO Rally, we had not suffered any mechanical problems and were happy to gang them all up in one event. And at the awards breakfast, we learned Scott had amassed enough points to take the overall co driver’s divisional championship in our class!
How We Started
I bought the 1988 323 GTX from Bill Morton, a New Zealander who helped prepare Rod Millen’s 323s for the Asia Pacific series. He had built the GTX for his own rallying pleasure and was forced to sell it after taking a job with Toyota Team Europe. He lamented-and I reveled-in the fact that he had only tested the car once and had never gotten a chance to race it.
But Morton had prepared it well. He removed the interior except for the original front seats, door panels and dash. He and Mike Welch welded in a superb roll cage, reinforced with gussets, and painted the interior refrigerator white. Headroom abounded. They bolted on a sturdy skid pan and numerous mud flaps. And they installed an HKS manual boost control and PFC F CON fuel controller to extract additional horsepower from the tired motor.
But the big feature was the suspension: Morton had managed to procure a rally suspension that had been on one of Mazda Team Europe’s 1988 World Rally Championship cars. This suspension was much stronger than the stock setup and the spring and damping rates provided phenomenal handling over loose, rough surfaces. The rally suspension provided adjustable spring perches for varying the ride height and Bilstein competition dampers.
I knew the basic preparation was right. I knew there was a good divisional series in Southern California. I knew I had to have the car. So I bought it, figuring I’d run a few local events. Besides, I reasoned, the car was street legal so I could always use it to run around town.
A mere eighteen months later we had won two championships and had posted finishes in the top five nationally. My experience in autocross, road racing and blasting down the dirt and gravel roads of Eastern Washington and Northern Idaho seemed to have paid off.
The real key to our success, however, was sound car preparation, a crack crew chief and consistent driving.
Rallying What It Takes
Probably no other motorsport requires the combination of car preparation, driving ability, endurance and reliability demanded by rallying. Triumph in the face of adversity is the battle cry of the successful rallyist.
The key is car preparation. A competitive rally car must be fast, tough and reliable. It must be driven consistently fast, with more emphasis on consistency than on speed. PRO Rallies often comprise more than 100 miles of special stages and another 200 miles of transit legs-quite a bit longer than a 20 minute regional road racing event or three minute autocross. Many times we’ve seen drivers go extremely quick in the early stages only to break or crash later in the event. We’ve been guilty of this ourselves.
The car must be prepared to finish events. Too many teams spend too much money on horsepower, overtaxing the gearbox, suspension and brakes. And assuming you can’t afford to spend more than $30,000 for a six speed gearbox, the engine must offer a generous rev range with enough torque at the low end to dig the car out of sandy switchbacks.
Preparing The Rally Car
Our 323 suffered two major crashes during the season. In the first one, I mistook the little 323 for a stadium truck and launched it 12 feet into the air at a rally sprint on the Glen Helen, Calif., motocross facility, landing the car on the front bumper. In the second one, we drifted off a sweeper at the Prescott Forest PRO Rally, rolling four times down the mountain.
Most of our development efforts coincided with repair work from these crashes. Road/Race Autosport, a race preparation shop run by Scott Webb and Mike Welch in Los Alamitos, Calif, prepared the car.
Welch replaced the body work and painted the car white with a scheme reminiscent of Mazda’s 1988 World Rally Championship 323s. Road/Race replaced damaged and worn suspension bushings, lateral links, trailing arms, differential mounts and engine mounts using components from Mazda’s Competition Parts division.
Nonslip pedals help a driver keep his feet in place on those rough stages.
The benefit of strut bars is sometimes called into question, but we have witnessed their virtues. The stress of rallying was causing the front strut towers to rotate and gravitate inward. We had gained two degrees of camber and a new fender was off by more than an inch when we tried to match it up to the inner liner. Road/Race solved this problem by designing a front strut bar to tie the towers together. Most strut bars on the market are made of small diameter tubing and often are bent in several locations for clearance reasons, allowing them to flex under the high stress loads. The Road/Race bar is a highly rigid, yet lightweight design with larger diameter tubing and minimal bending between the struts to prevent any flex.
To reduce brake fade and improve reliability, we installed semi metallic brake pads, racing fluid and braided steel lines.
Most PRO Rally cars use a rally computer I to help their drivers keep on time.
Extensive underbody protection is required on a rally car to fend off rocks, tree limbs, flyovers and other hazards, particularly on the rough special stages of the Southwest. Morton’s skid pan protected the sump, and Road/Race added numerous guards made of carbon fiber to protect other areas, while clever metal skids were welded to the leading edges of differential mounts, exhaust joints and important bolts. And all those mud flaps aren’t just for snazzy good looks. A season of flying rocks is like a sand blaster working around the clock that will gradually grind suspension pieces away to nothing. So Road/Race installed mud flaps made of LPDE plastic behind each wheel. in front of the rear trailing arms next to the lower timing chain cover and anywhere else that was exposed to flying rocks. We’re constantly replacing them.
The car came with safety harnesses. so inside we added a rally computer, a pair of racing seats, a padded box for our helmets, window nets on both sides, an intercom and a co-driver’s map light with a red lens-a white light is distracting for the driver and is too bright for the white paper in the co-driver’s route book.
Road/Race replaced the bracket holding on our driving lights with an attractive pod for our massive, new PIAA fog and driving lights. The pod keeps the lights out of harm’s way, locates them out of the cooling air for the engine and can be quickly removed or installed for daytime and night stages. It also reduces vibration, which can be distracting.
We fitted 15 inch DP Enduro wheels shod with Michelin rally tires. Our competition tires are size 14/62-15 L4, meaning they are 140mm wide, 62cm overall height and 15 inches in diameter using compound No. 4 on an L-shaped block tread design. With four-wheel-drive cars, particularly those with locked differentials, it’s important to use the same size tires on all four corners. Otherwise the drive train will fight itself, possibly leading to an expensive repair. While rally tires may look like snow tires, they are really very sophisticated and provide surprising grip on pavement and are nothing short of phenomenal on dirt. The extremely strong sidewall construction of the Michelins makes them incredibly resistant to punctures from sharp rocks.
We try to start an SCCA National PRO Rally with six new tires. In 12 events, we’ve had only two punctures (both on the same stage!) and usually finish an event with four serviceable tires and two new spares, all of which can be used for the next event. This provides us with a complete set of spares in case the event is particularly brutal on tires. To be totally prepared, we should have gone to Michigan with ten new rally tires, six snow tires and six Showroom Stock tires for the tarmac stages. But we couldn’t afford to be totally prepared and, in the end, that was okay.
Halfway through the first season I asked MFI Power in Garden Grove, Calif, to rebuild the engine. John Mueller focused on a broad powerband with strong low-end torque rather than maximum horsepower. With the stock gearing, we had often found ourselves lugging out of sandy, uphill corners at the bottom of second or third gear.
For the most part, Mueller rebuilt the engine to stock specifications, porting and polishing where possible. However, he lightened the crankshaft by five pounds and dropped another nine pounds off the clutch and flywheel assembly to maximize off boost performance. He knife-edged the crank and machined the flywheel from aluminum stock. We added Torco 5W30 synthetic racing oil to provide maximum protection and minimum friction. We think Torco might have saved the engine when we lost all the oil in Michigan.
The result was an estimated 190 horsepower compared with 135 hp stock. We selected a Centerforce competition clutch and pressure plate designed for an RX-7 to handle the increased horsepower and the abuse of rallying. Road/Race designed a pair of hood ducts to extract hot air from the engine compartment. These reduced engine temperatures at the hot weather events, and we could see the hot airwaves coming out of the engine while waiting for the start of stages.
Our most exotic piece of equipment, a close ratio competition gearbox, was installed late this past season. Our top speed has dropped to somewhere in the 90s, but the gearing has really paid off
Competing for an SCCA National PRO Rally championship is not cheap and should not be considered a grassroots motorsport any more than IMSA Firestone Firehawk is grassroots road racing. However, it is possible to run a Divisional series or selected National events on a budget. For my money, there’s not a more exciting or fascinating form of the sport available.
When he’s not racing in PRO Rallies, Mitch McCullough is involved in motorsports public relations for various companies.