
Sand Rail With AMG M113K Motor AEM Infinity ECU Dyno Tune
Basically this is a stock Mercedes/AMG Supercharged 5.4 Liter V8 in a sand rail chassis. The headers add some additional HP along with the AEM Infinity ECU. The rail is being tuned here on the RRE Dynapack Chassis Dyno by Sam C “icantunafish” The motor runs on California 91 octane pump gas with the Infinity ECU controlling the 50% water and 50% methanol injection.
The AEM Fail safe gauge keeps tabs on the flow rate and shuts the meth party down if the flow is out of range. If the meth nozzle is clogged of the pump is dying, then the flow will be low and the fail safe cuts in. If a meth pressure hose were to pop off or otherwise spring a leak then the fail safe would see too high a flow and shut things down also.

EVO X Timing Chain Follow Up
We previously went over the EVO x’s 4B11 timing chain stretch woes here. On a good day when everything is working correctly the ECU uses the cam position sensors along with the crank angle sensors to calculate the stretch of the timing chain. When it all works like it’s supposed to, the dash warning system shows a big triangle warning sign so you can get things checked out.

All too often this system fails the owner. We have had cars with the timing chain well within spec get various timing chain and (more…)
RRE 4G Eclipse Competition GS Headers (2006-2014) Install Pics and Tips
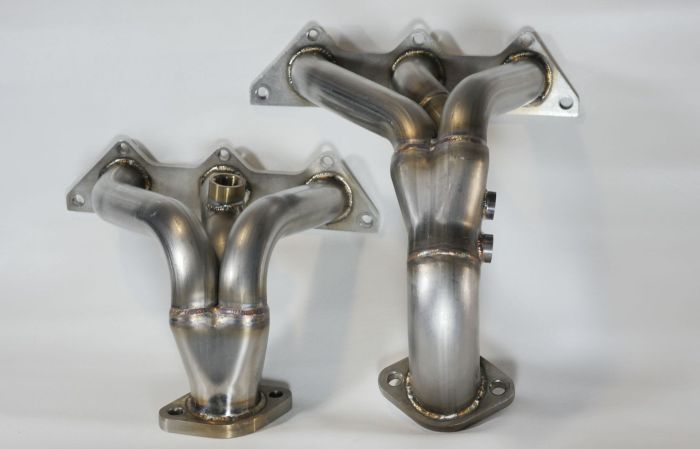
RRE 4G GS 4cyl Headers $530 plus $50 shipping within the lower 48 states: For Canada or other locations email the shop roadraceengineering _at_ gmail dot com with your full contact info and full shipping address.
We make 4G Eclipse headers. We are never quite sure if everyone is headed to China to get their parts or if they prefer American made parts still. While quality parts can be made in China for a decent price, quality control over workmanship and materials is always a concern. Locally we have much more control over everything.

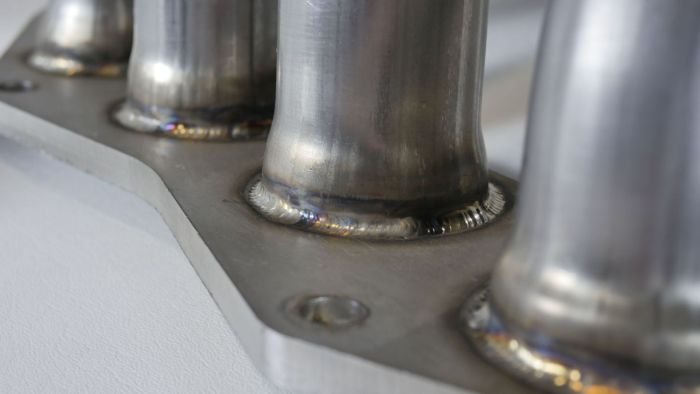
Here is a batch that just finished up. TIG welded stainless Steel throughout. We did an install and took some step by step pictures.
Change That Belt
So do you think it was time to finally change this serpentine belt? :-P Maybe this is why Mitsubishi recommends changing it every 30k miles. Heat can really shorten the life of rubber parts. This 40k mile serpentine belt lived its harsh life in Bakersfield. The serpentine belt os the one long belt that drives the A/C, Power steering, water pump and alternator. Important stuff for sure. Cracking on the inner ribs of the belt or a brown color means it is time!

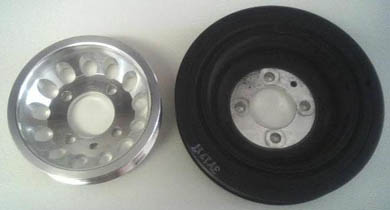
RRE Eclipse GS 2.4 MIVEC Underdrive Pulley Kit
RRE Eclipse GS 2.4 MIVEC Underdrive Pulley Kit
$189 plus $11 shipping for USPS Priority Mail within the lower 48 states. If you are looking to get one shiped to somewhere else, contact us for a price with shipping included.
This pulley kit has yielded an improvement of 6-7 whp and 9 ft/lbs of torque in dyno testing. Both the lighter construction and smaller size helps improve power. Kit includes a new belt and the pulley. Everything that you need. Fits all 2.4 liter Eclipses and Galants from 2005 through 2014
First Drives: Shaking down my RRE built EVO VIII at Streets of Willow for the first round of the AWD Challenge
[Part IV in a series]
words by James Singer
stills by CaliPhotograpy
video by my GoPro and Aldric’s GoPro
In previous blog entries, I have said that I am a pretty normal guy that is trying to track his car without going broke while maximizing fun. I started writing about my experiences while running NASA’s HPDE series from HPDE1 to 3. After that, I started trying out some time attack competitions with Extreme Speed in their AWD Challenge. Since starting out, I have had some ups and downs. I have gotten a lot of support and even some hook ups but I have also shattered a piston due to my own stupidity. However, I did not give up and this is the next chapter with a new set up for 2013!!
4B11 Timing Chain – Good, Bad and Ugly. (mostly ugly, not so much good)
The 4B11 motor that comes in the 2008+ EVO X and 2009+ Lancer RalliArt does not have a timing belt. It has a timing chain that turns the cams. The computer keeps track of how much the chain stretches over time. It will tell you when it is time when all the systems are working properly. If you get the triangle warning light and the car has a rough idle, it might have jumped a tooth or two. A couple more teeth jumping means that valves and pistons start crashing together. If your chain has been confirmed to be stretched and you have a rough idle, don’t drive the car at all.
A recent customer never did a full service and rarely changed his oil in 80k miles. The timing chain stretched enough to jump quite a bit. It bent the intake valves, when the piston came up it smashed the valve stems into the guides to where they broke off. One of the valves got bent into a perfect little taco. It was able to get knocked back into the intake manifold for an out of the park home run. Here is a new redesigned timing chain (with less links to rub against each other) that still will stretch prematurely if you don’t change the oil enough:

How much stretch it takes to make everything crash:

Head damage:

Seriously… dude! Change your oil more often! (more…)
Black Fuel Pump Relay Problem – EVO X/RalliArt
The following applies to the 2008 through 2013 EVO X and 2009 to 2013 RalliArt. It has been known for quite some time now that the fuel pump relays are complete crap in the EVO X and RalliArts. Swapping out to the better blue fuel pump relay is included with a dyno tune here @ RRE.
I had a 2010 X come in for a tune last week. The car had basic mods just installed so it should have been good for a “before” pull as-is on the dyno. After the before pull I’ll put in a 3 port solenoid and do the blue relay swap at the same time. Before the full pull I tipped into the throttle at 3500 rpm to check boost and AFR. It was super lean almost 12:1 afr. For a drop in filter and cat back exhaust it should have been high 10s or low 11s at least.
So I went straight for the fuel relay and swapped it with the blue one. AFR went right back to where it should. Bad black relay caught red-handed. So I figured cut it open to see what exactly is going on in there.
Cut open relay:

Lever assy that the coil pulls sideways and pushes down on the contacts:

I can only guess someone had the bright idea to make a low profile relay by laying the coil on its side. When energized it pulls a lever sideways that pushes down on the contacts. (more…)
LEET Roll Cage Build – Part 3 – Prep and Paint
We last left off on this roll cage build with finishing all the welding. Now it is time for the cleanup, prep and paint.

All unnecessary seam sealer and sound deadening gets removed to lighten things as possible. We trimmed off any brackets and tabs. Most small holes get covered and smoothed over with metal tape for a cleaner look.

All the bare steel on the roll cage and welds needed to be cleaned and prepped with a light acid wash.

Everything gets masked off nicely. The floor gets cleaned and roughed up with sandpaper and a Scotchbrite. Blow all the (more…)
LEET Roll Cage Build – Part 2
Here are the next round of pics building Ben’s full roll cage. The last article had the car getting stripped and interior cleaned. The main hoop and basic bars getting bent and tacked into place.
We had dropped the roll cage down off the foot plates to be able to weld all around the tubes up in the roof area. With the upper bars now welded all the way around, the roll cage goes back up on the floor plates and the floor plates get welded in place.

The b-pillars are closed back in now that they have been lightened.

The door bars are taking shape. The driver’s side has the bars extending deep into the door “NASCAR Style”

The passenger side is a lighter more simple “X” design (more…)
LEET Roll Cage Build – Part 1
With all the 600 whp mods Ben has lately, he felt it was time to step up the safety from a bolt-in Autopower 4 point roll bar to a full cage. Here is the transformation:
The first step was to gut the interior. Everything that could be unbolted was unbolted. The dash comes out, carpet, seats, door panels, headliner, wiring and more.

Bryce was enlisted to help. Anything with a Phillips head screw was his responsibility.

Next is to clean and strip any caulking and paint or undercoating where the base plates will get welded into the chassis. We used 1.75″ diameter .120 wall (more…)
RalliArt Lowering Springs – Installed Pics, Measurements
People always want to know, how does a car look with different lowering springs, I think I have some answers.
We’ll start off with a car with stock springs:
One car:


X-Melt :-P
Watch your underhood temps with the EVO X. Mitsubishi had to move the turbo to the back of the motor with the EVO X to make it easier to pass the newer emissions regulations. This puts the catalytic converter closer to the turbo. Already in some European markets Mitsubishi had put a pre-cat in the down pipe of the EVO 9. While solving their cold start emissions problems, this makes for headaches for guys running track days, guys running large turbos and also concerns for people running headers.
Here are some heat failures we have run across lately:
Tubular headers with a plastic valve cover. In 2010 plastic valve covers started showing up on the 4B11 motors. Probably cheaper, they seemed to do the job well enough. They just don’t deal well with heat from a tubular header. We have seen three of these failures. Even when using the factory heat shield wrapped around the headers, if the heat can concentrate up through a gap near the valve cover it will melt.

Lose bolts:
This customer installed stock frame upgrade turbo came loose. The heat shooting out through the small gap at the flange burned a hole through the factory heat shield. Then it proceeded to melt the wire harness and seriously toasted the AMS pump unit. Hopefully the fuses that all blew protected the really expensive bits.


RRE 4G GT Headers Install Tips and Pics
RRE Competition Stainless Steel Race Headers Eclipse GT V6
$660 plus $55 shipping within the lower 48 states. For Canada or other locations email the shop roadraceengineering _at_ gmail dot com with your full contact info and full shipping address.
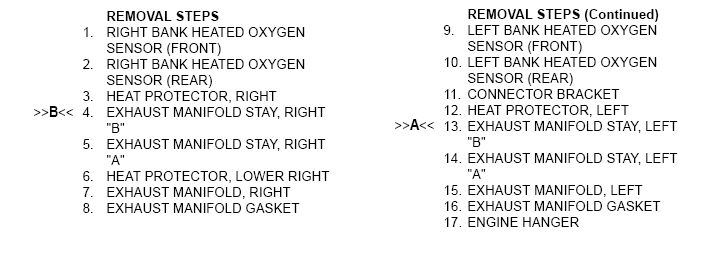
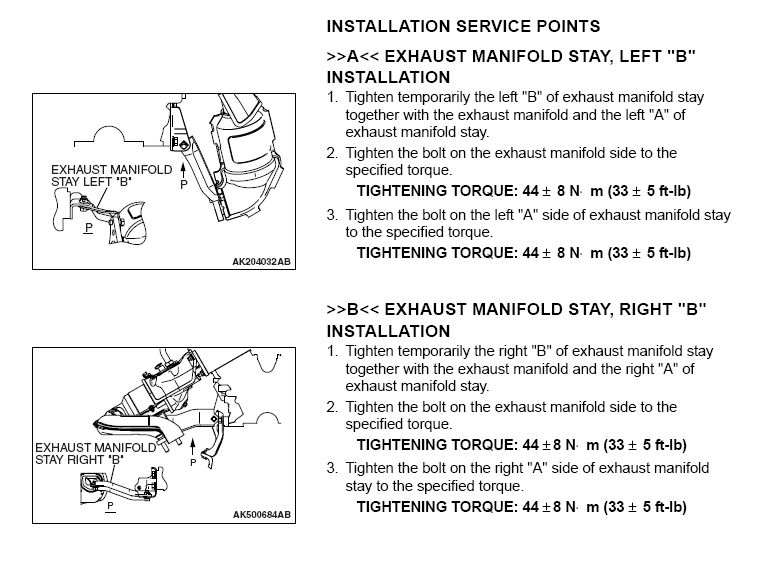
On the Eclipse GT, the front header is fairly straight forward. Access is great, nothing too difficult for a weekend warrior. The rear header… good luck :-P It isnt so much that the RRE header is difficult to install, it is that the rear stock exhaust manifold is very difficult to get out of there once removed. If you live where they salt the roads, be prepared to deal with lots of broken bolts and stuck threads.
Start with soaking all the nuts and bolts with a penetrating lubricant the night before. Something along the lines of Lucas Tool Box Buddy, PB Blaster or WD-40 will to the trick. With all undercar bolts and nuts, especially with exhaust bolts, much care and respect is required. Even with everything soaked well, slow and steady works best. Dont use power tools. You want to slowly remove each nut or bolt while feeling for if it is getting stuck. If something galls up or starts to seize by feeling tight after breaking it loose, stop immediately and spray more lube on the thread. Then go back tight a bit until it feels free again. Spray more lube. then try loosening it again. Keep working it back and forth with out forcing things too much. Once you really gall up the threads, you can be in a big mess. THis goes double for the O2 sensor removal. Crack them loose and work them slowly out. if they tighten up at all, stop, lube and reverse. Lube and repeat.
Unplug the O2 sensor wires. You can unbolt the stock Y Pipe fairly easily. Unbolt the front header from the cylinder head. Note which sensors plugged into where. Were they the pre cat sensors or post cat sensors. Only the post cat sensors will get threaded into the spacers. Use your cell phone camera as you go to make notes of things.
The rear header is pretty difficult to install. Well… actually it is that the rear exhaust manifold and cat assy is very difficult to remove from the car. It is in an awkward location to begin with. Then once you do get it unbolted, it does not fit out through the tight spaces well at all. The passenger front wheel and axle need to be removed to make some space for the stock manifold to come out. Even then, it is a tricky wiggle and rotation to get out of the hole. A few people give up and chop it into two pieces to get it out of there :-P. But that makes going back to stock impossible. Once out, the RRE rear header easily fits in there.
The O2 sensors that were originally after the pre cats will get installed with the spacers. The O2 sensors that were originally before the pre cats and closer to the cylinder heads will get installed directly into the new header.
Here is a pic of the hardware and gasket kit that we supply with the headers currently.
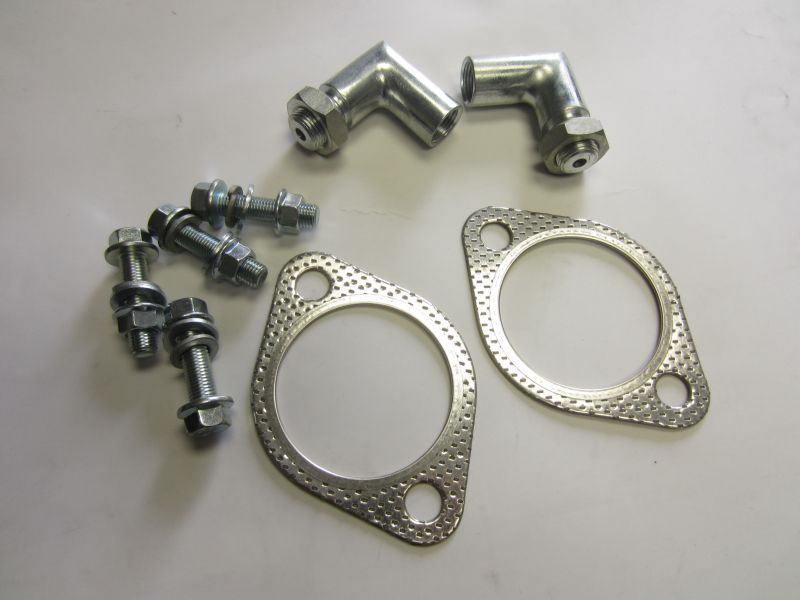
(4) 10mm nuts
(4) 10mm Bolts
(4) 10mm washers
(4) 10mm Lock Washers
(2) 2 bolt composite fire ring gaskets (to Y Pipe)
(2) 90 degree O2 Sensor Spacers
Install the headers, reusing the factory gasket to the cylinder heads is fine. Use the new supplied gaskets to the Y pipe. Tighten all the bolts, torque settings are included here at the end if you are into that.
It does not matter which O2 sensor goes in which location in the header. There is no longer a pre cat to be in front of or behind of. But the sensor that was after the cat gets a spacer (the one with the black wire cover) needs to be the one that is bolted into the spacer.
Smog-
These headers eliminate the front pre-catalytic converters. They are not for use on public highways in the USA. The Eclipse GT V6 motors are are popular with various front wheel drive dirt circle track race classes so that is what they are intended for. You can still pass a tail pipe inspection with the main center cat in place if that is what your race class requires.
Noise-
These headers will increase the exhaust noise considerably. It is a good sound. But it is definitely louder. It is even noticeably louder with a stock muffler. If you have a stock center cat and a straight through muffler (think Magnaflow) it will be sporty loud, think Mustang rumble) but livable. The younger you are, the more you will like it J If you remove the center main cat, things get super loud, think open race car exhaust sound. Check with your sanctioning body for sound level requirements.
O2 Sensors and Spacers-
There are Oxygen sensors (O2 sensors) that need to be transferred to the new headers from the old manifolds. If you do that part wrong or upside down somehow a little yellow light will come on. If you drop or bang on the O2 sensors too much it can damage them. If you get WD-40 or anti-seize contamination in them, it will damage them. But then again that little yellow light comes on for nothing or even something little like leaving the gas cap a little loose, its sole existence is to nag you about potential smog issues. The yellow light isn’t all that scary to us, but it seems to horrify some people.
With the current 90 degree spacers that we supply, about 1 out of 20 people get a SES light and we help them deal with it as best we can. If that possibility disturbs you then headers are not for you. We will not be redesigning anything. We have done all that is reasonably possible to make a little money selling them and still have an affordable product built in the USA. We are happy with the balance that we have struck.
This simple OBD 2 code reader works well and only costs about $20 from Amazon

IF the light does come on usually the hole in the spacer needs to be drilled out a little bit. Just a little bit bigger at a time. It is easy to make them bigger, very difficult to make them smaller
We found the difference between cars is whether or not they have a main cat after spacers and how restrictive the exhaust system is. Cars with totally free flowing low back pressure systems need a bigger hole. More restrictive systems need a smaller hole. You want to read out the actual code before modifying the spacer.
The spacer is trying to trick the ECU into thinking that the cat cleaned things up some (but not too much). More exhaust system back pressure or less will require playing with the size of the hole in the spacer and also the volume of the spacer. No one spacer works for every car. It is a black art and takes some fiddling and paying attention to what code and reacting accordingly.
But seriously, these are for race cars only and you shouldn’t be complaining about a little yellow light. Why do you even have the dash in there on your race car?
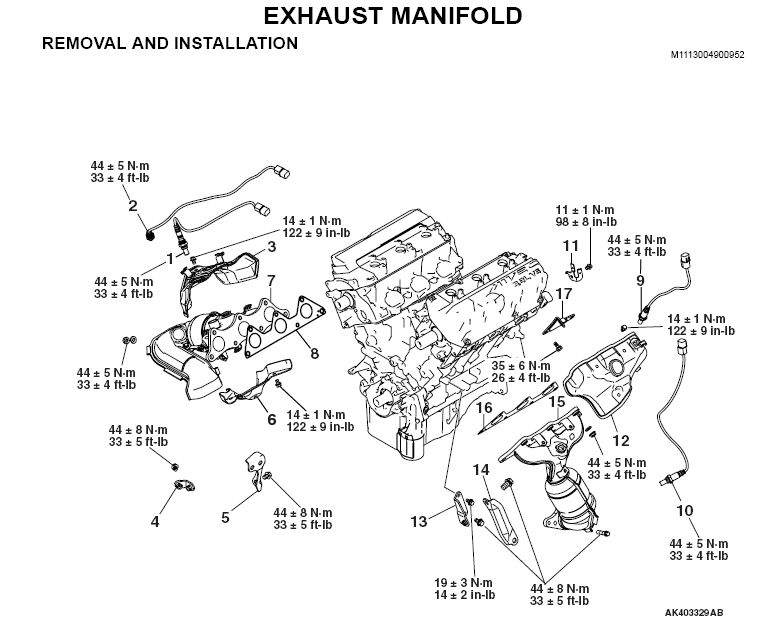
Factory Parts Drawings:
Torque Numbers
EVO X/RalliArt – Inside the Stock Muffler
We wanted to see what was inside a EVO/RalliArt muffler so we cut one open to see what made it work. As a kid I always got in trouble for opening things to see what made them work.

At low exhaust pressure the flow through the stock muffler follows these red lines. All the exhaust has to flow through _12_ little holes. Then into a chamber where the only escape is a bunch more holes. Then through a 2” pipe into the center chamber, then out through either of the interior tip pipes.
:-/
Track Day Prep Check List
by James Singer (track n00b)
Last year I decided to stop talking about going to the track and to actually go to the track. One of the things I wanted to do was to see the reality of this dream I had of tracking my car regularly. I learned a few things along the way and I wanted to post some of that leaving the rest open to discussion (mostly on SCE).

[my first day at the track running with NASA in HPDE1 at Buttonwillow Raceway Park CW13]
EVO 9 AEM Meth Kit Install
Any meth kit is only as good as its install, here is one EVO 9 AEM Meth Kit Install:
AEM one gallon tank mounted in the left rear 1/4 panel behind the trunk liner:

Later went to a 5 gallon tank with a full size spare tire:
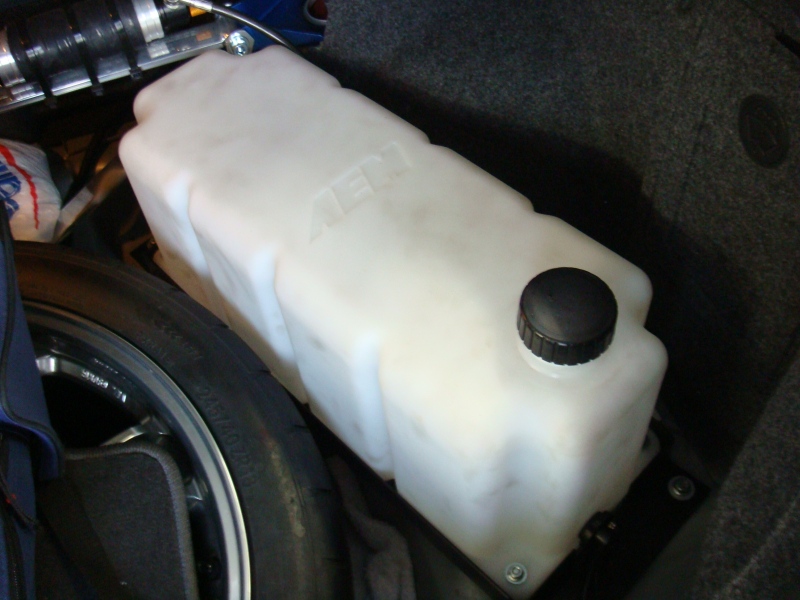
The pump fits nice under the spare tire:

The hose runs through a grommet out through the spare tire well. (more…)
Road/Race Engineering’s EVO 8 Weights
We weighed our shop car back when it was stock. Had about a half tank of gas in it. Regular options including the Biggee wing and a sunroof. Weights are without a driver.


Here is a new stock EVO 8 RS we just weighed (5/04) Full tank of gas. The RS comes stock with no stereo, no sunroof, very little sound deadening, no ABS, manual windows, but they do have A/C.

Those HID lights are cute and sure look nice at night. But that is close to 17 pounds you are carrying around hung out on the worst part of the car to affect handling.

How to Rate Coil Springs Without a Spring Rater Tool
Mathematical Spring Rating Formula
Not many people have access to a spring rating tool. You can come a lot closer than you would think just using some dial calipers and a measuring tape to measure the spring rate of your springs. Here is how to do it:
SPRING RATE = GD4/8NM3
G = Torsional Modulus for Steel 11.25 x 10⁶
D = Wire Diameter in Inches
N = Number of Active Coils
M = Mean Coil Diameter in Inches. Mean Diameter Is:
If using I.D. = 1 Wire plus Inside Diameter
If using O.D. = 1 Wire minus Outside Diameter
8 = A Constant for all Coil Springs
The “G” Factor is always the same for all coil springs made from
steel (11.25 x 10⁶ can also be written as 11,250,000).
EXAMPLE: 10 active Coils and a mean coil diameter of 5.00 inches and a wire size of .625
11,250,000 x .625 x .625 x .625 x .625 = 171,661,370
8 x 10 x 5.0 x 5.0 x 5.0 10,000
(Constant) x (Active Coils) x (Mean Dia.) x (Mean Dia.) x (Mean Dia.)
Spring Rate = 171,661,370 / 10,000
Spring Rate = 171.66 lbs./per inch
HOW TO DETERMINE ACTIVE COILS OF A COIL SPRING:
Count total number of coils, subtract a coil for each coil that touches, these are dead coils. Ground flat ends are a dead coil. Start count with cut-off end facing you directly above would be one and so on. Not all coil rings are even coiled. You can have .125, .25, .5 or .75 of a coil (Example 10.25 Coils).
RRE Turbo Oil Supply Line Instructions
| Install the banjo bolt fitting onto the end of the -4 stainless line and tighten the fitting before bolting the banjo fitting to the turbo. Install the assembled oil supply line to the turbo before installing theturbo onto the manifold. Use new copper crush washers and torque the banjo bolt to about 25 foot pounds.1G: Remove the correct Allen plug from the oil filter housing. See the photos below for the correct location !If the Allen plug is tight and you think that you might strip out the Allen socket, heat will loosen it. The heat allows the aluminum housing to expand and loosen it’s grip on the plug. Heat also loosens any thread sealant. Get it warm with a propane torch or oxy/acetylene torch. Don’t melt anything, just warm it up good. If you strip out the Allen fitting to the point that an Allen wrench wont turn it, you are screwed.2G: Remove the larger fitting and replace it with the 90 degree fitting.Use thread sealant or Teflon tape on the pipe threads that screw into the housing. Note that the threads are cut into the housing at a different angle than the face of the housing. It will almost look like it is threading into the housing crooked. Be careful with any sealant or tape, you do not want anything to get into the turbo bearings.If you find that the clearance to the oil pressure sensor is too close to the fitting to screw it in, remove the sensor, install the 90 degree fitting and re-install the sensor.
2G Connected at the turbo
Oil supply location on a 2G Note that the fitting screws into the housing hole at a slight angle to the machined face. This can seem a little odd when first getting the threads started. Note the angle of the stock adapter fitting before you remove it, this will help. The fitting threads are a tapered pipe thread, as you screw it in, it will get tighter. Be sure to stop at a clocking that will allow the proper run of the oil line.
Tied off to the fan shroud.
Tied off to the fan shroud.
Don’t let the line contact the fan shroud directly. We use a double zip tie to separate them.
1G If you specified the oil supply line for a 1G, use the supplied short 10mmx1.25 bolt and crush washer to block off the stockoil supply location at the cylinder head. Oil supply location on a 91-94 1G Turbo
91-94 1G supply location pictured. You want the upper and outer fitting location. Using the lower fitting on a ’91-94 oil filter housing (water cooled oil cooler) will result in the turbo receiving unfiltered oil.
90 1G supply location pictured. On a 90 model oil filter housing, the two fittings are spread out a little more. Use the lower fitting on a ’90 oil filter housing (cars with a factory air cooled oil cooler). Using the upper outer fitting will give unfiltered oil to the turbo.
Stock, the turbo oil supply is just about the last oil in the whole motor. If you get it at the oil filter housing, you get oil fresh out of the filter. Note that if you do not use the specified location, you will be using unfiltered oil.
|


RRE 323 GTX Bosch BOV Instructions
This is a photo of the stock 323 GTX Compressor Bypass Valve or “Blow Off Valve” (BOV)

Inside the hose that runs from the pipe at the throttle body and down to the BOV, there is a restrictor that blocks the hose from 13mm down to 8mm. All your BOV air passes through this little hole. You can remove it to get some more flow through your stock BOV but with an open air filter you will hear some wicked bovine farty noises.
To remove the restrictor, find it by squeezing the hose to locate it. Pull it out with needle nose pliers.

An upgrade for a leaking BOV or to get rid of the strange noises is to replace the stock BOV with a Bosch BOV that comes stock on many European turbo cars. It is a quality part but can be had reasonably cheap. Expect to pay about $50, we keep them in stock. To connect it you will need two radiator hoses from an auto parts store. We used part numbers 71423 and 71409 from Pep Boys. I believe these are generic hose part numbers, possibly Gates numbers. If you cant get the numbers matched up, do like we did and ask for permission to climb the counter and go digging through the bins till you find what you need.

You need access to some slightly larger hose clamps, with the larger hoses and BOV, some of the stock clamps are not quite big enough.
This is a photo of the Bosch BOV installed. It uses a slightly smaller vacuum hose fitting, we used a small adapter to go from 6mm hose down to 4mm. The car this was installed on is still running stock boost. This mod eliminated the Moo Cow noises but did not make any noises that would frighten a honda or impress the ladies.

For more noise (good sounding noises… WHOOpshhhhh!) you can use a GReddy Type S BOV. It is a much more custom install best done with new I/C piping. The GReddy valve uses a two bolt flange that will need to be welded onto a pipe. The GReddy valves run about $200

The GReddy BOVs shown here are blowing to the atmosphere. With careful adjustment you can get away with this to some degree. The lower pic to the right is on a car with a TEC2 ECU that allows you to blow the air out with no problems.
